Want to understand who is clicking on what when it comes to marketing collateral? We walk you through how to track link clicks in Google Analytics so you can better determine what content is driving results.
Google Analytics 4 is an essential tool for measuring your marketing content and collateral.
Related: Get set up with Google Analytics 4 and what to expect
We found that 90% of marketers consider Google Analytics their go-to choice for marketing measurement.
GA4 can track a lot, but how does it track clicks on your website? Chances are you want to see how visitors engage with you and your content.
Even more importantly, perhaps, you might want to learn how users move through their customer journey via your website.
🚀 Pro Tip
Not sure how to track, or even understand customer journeys? Read our guide to the customer journey stages plus how to track them
Understanding how users react to your CTAs, whether that’s on your website or in your campaign content is key to learning what pushes users through the funnel and gets them to convert.
So, in this blog, we’ll teach you:
Let’s get started!
Link tracking is where you can see if users click links you share as part of your marketing collateral.
There are a range of different types of link click tracking.
From:
As a marketer, you likely use your different channels to drive users to a certain action.
No matter what the marketing collateral is, chances are there are links.
And the issue you have is being able to track those links.
Google Analytics doesn’t offer visitor-level analytics, which means you can’t pinpoint a user that clicked a social media link and then converted.
And that means you can’t fully understand their complete customer journey.
But, with proper link click tracking, you can start to get a better understanding of the impact of your marketing content and piece together what’s working, and what isn’t.
There are two types of link click tracking:
🔗 Want to learn more? Follow Laura on LinkedIn to keep up to date with tips and tricks on tracking your marketing analytics
This is where a link is placed on:
It’s a link housed on another source that points to your website.
For these types of links, you can use UTM tagging to track them in Google Analytics 4.
Think of an internal link as one placed on your website to a pdf.
Internal links are usually housed on your website and take users to other places on your site.
For example:
You need to use Google Tag Manager to track these actions.
If you used a URL parameter on these links, then you would ultimately wind up duplicating traffic to your site within GA.
Link clicks are probably the most common interactions on a website. And clicking links on other channels to a website is a key way to measure engagement.
On-site you click links to navigate from one page to another.
That’s why you need to measure and capture clicks. Evidence of your link clicks can show you more detail on user behaviour.
Some link clicking options in Google Analytics 4 include:
You can track external click links e.g. a social link to your website, by using UTM parameters. We’ll get onto that in a moment.
First, let’s look at what the standard options for link tracking in GA4 are.
Link tracking is where you isolate a particular link on a particular channel or campaign to understand its impact in terms of:
In Google Analytics, you can view the overall performance of any given page.
But, you can’t segment this down by a particular link, whether it’s internal or external.
However, there are workarounds. You can use UTM tags, or set up some simple GA4 reporting capabilities.
Let’s break them down.
Tracking link clicks in Google Analytics 4 is simpler than it was in UA. There’s also some automatic click tracking you can set up easily.
In this section, we’ll look at:
Let’s dive in.
When you set up your Google Analytics 4 account, you’ll have the option to set up Enhanced Measurement.
By default, this feature is enabled and will automatically track the following events:
You can check and enable enhanced measurement by heading to Admin. There, select Data Stream under Property. Here, you’ll be able to pick your data stream and then configure your enhanced measurement events.
⚡️Pro Tip
Want to learn more about events? Read our complete guide to events in Google Analytics 4 to see how to get them set up effectively.
You can view your outbound link clicks; remember this is clicks from your website to an external site, by heading to the Events report under Engagement.
This will set up easy link tracking as far as external links and document clicks go. But what about other, more specific link clicks that happen on your website?
You might want to track a specific link click on your website. Let’s say, you want to see how many people click a ‘book a demo’ button on a navigation bar. We’ll use our own website for this example:
First, you need to create a trigger that fires when this particular link is clicked.
Now this bit can be a bit tricky.
Head to Google Tag Manager and open the Preview Mode.
In this, click a few links. Once you click the first link, you should see the Link Click event in the Preview mode’s left sidebar.
Note: to see this, you either need to set live a ‘Just Links’ trigger in Google Tag Manager, or have your Enhanced Measurement turned on for external links or file downloads.
Now we know your website is tracking link clicks, we can look for a way to differentiate your navigation link.
Head back to the preview mode of your website in Google Tag Manager.
Here, click at least two links in your navigation.
Head back to GTM to look at the new link clicks.
Under Variables you want to look at Click Classes. You’re looking for a distinguishing term for your navigation button that you can use a signal.
In our menu link, we can see that our first link click, to our pricing page had a specific click class.
For our second navigation click, to our demo page, we had a different class show up:
Now, we have a signal to use for our Google Tag Manager trigger.
Head to Triggers and create a new trigger.
We’ll select this to be a Just Links click trigger and change it to just track some link clicks.
Here, we’ll get an option to filter out link clicks based on a particular condition:
As you can see, we’ve put in that click class that we found in the preview mode.
Once you’re done, save your trigger.
Now it’s time to create a corresponding tag.
Go to Tags and create a new GA4 event tag.
Name your tag, making sure to follow a format like ‘demo_nav_click’ otherwise it won’t accurately track.
Now we want to decide what parameters to send over to Google Analytics 4.
For our example, we want to see what page users are on when they click that link. However, there’s a whole host of useful information you could push across.
You can send up to 25 parameters with each event.
Make sure you assign the trigger you previously created to this tag and then click Save. .
Then, refresh the GTM Preview mode and click a couple of your menu items. Go back to the Preview mode and click those Link Click events.
Check if the GA4 event tags have fired and you’re good to go! All you need to do now is create a corresponding event in GA4.
Here’s how to set up events in Google Analytics 4.
To track links coming into your website from external sources, you need to set up some UTM tagging.
UTM parameters are add-ons to your link that GA4 can monitor and harvest data from. It will allow you to specify certain conditions about that link.
For every new link in a piece of content, whether that’s a link in another blog, a social post or an email, you should use a URL or link builder to create a trackable link.
Google has created a URL builder where you can create your own trackable URLs so you can track links.
Step 1: Enter the link you want to track.
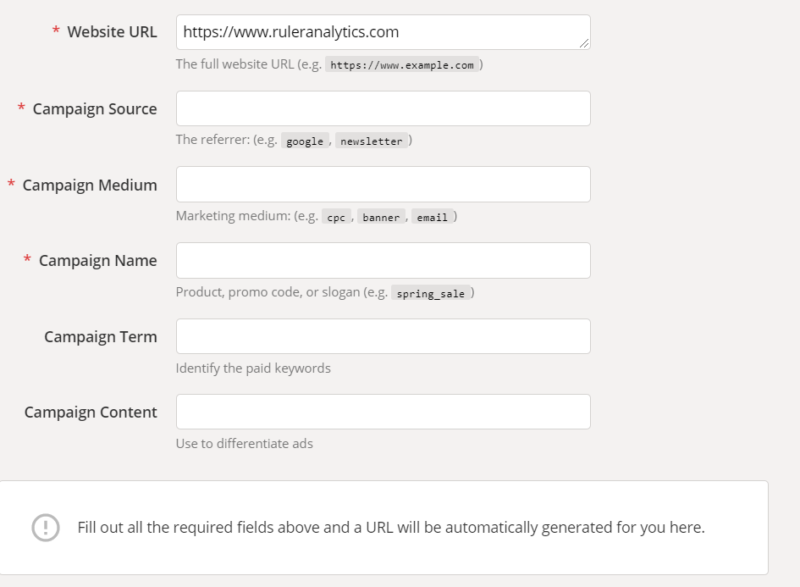
Step 2: Add the three main parameters that you’ll want to track.
Source: This tells Google where traffic is coming from
Medium: This tells Google what kind of source it’s coming from, so paid, social, or email as examples
Name: This is (obviously) whatever you’re naming your campaign. Try to make it simple but distinct enough that you don’t get campaigns confused.
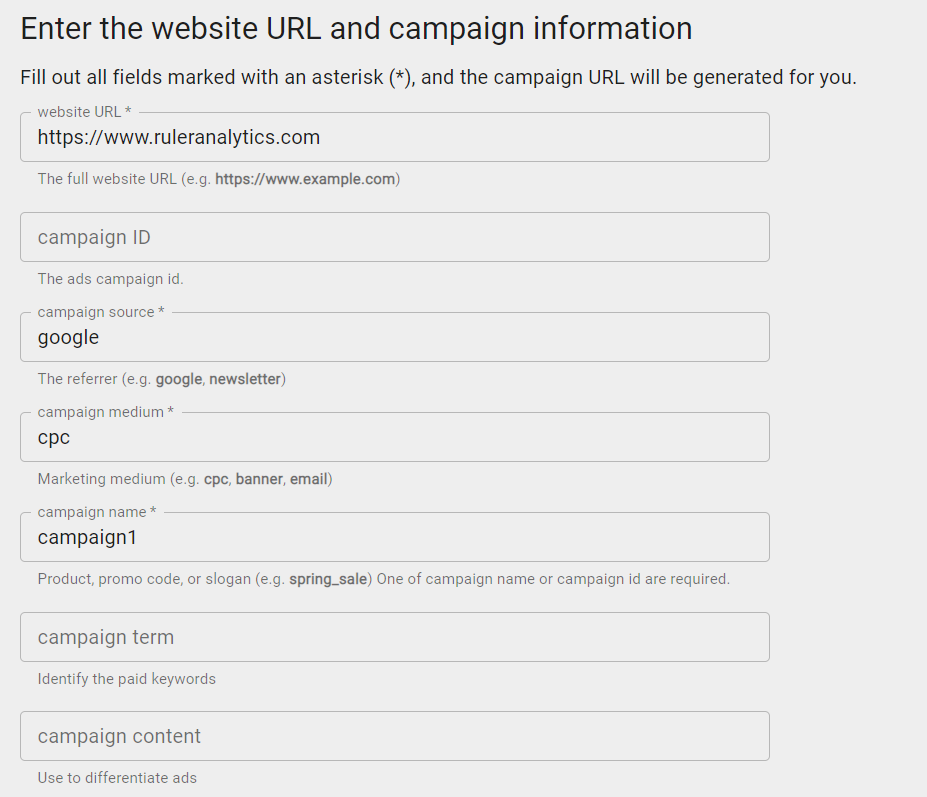
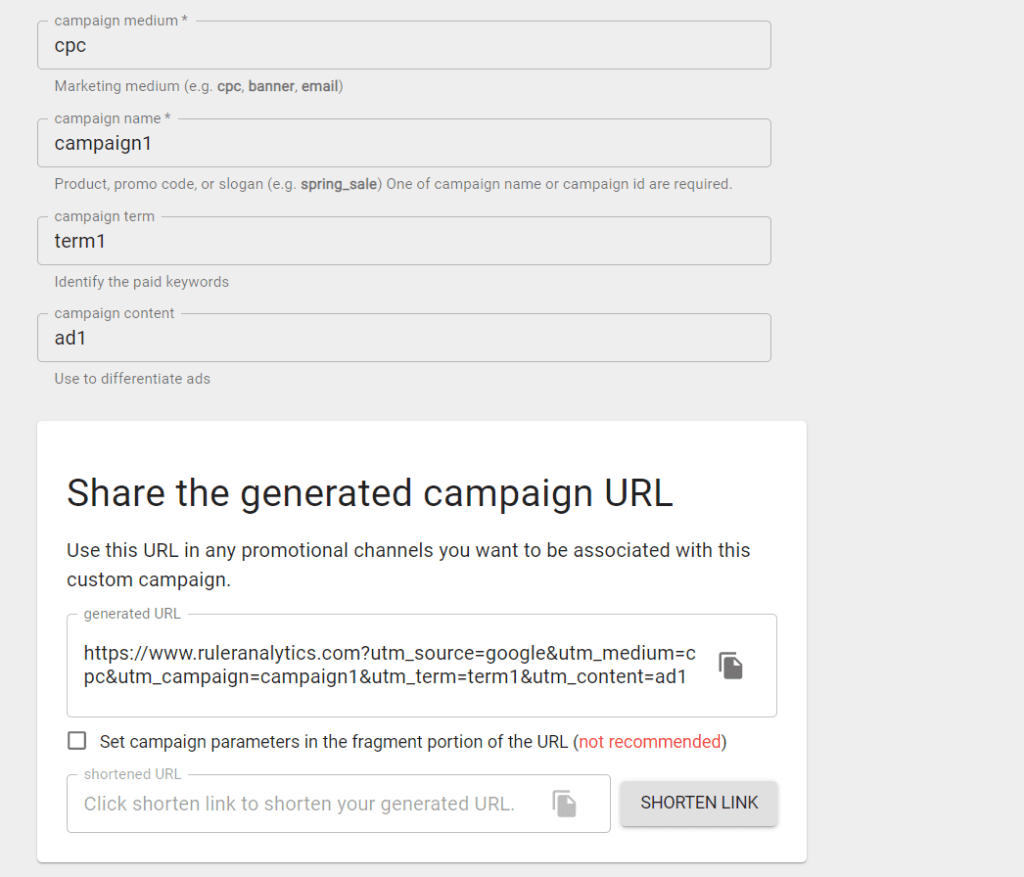
As you type these three data pieces in, you’ll see that a URL being auto-generated.
You can also add in campaign medium or term, which are simply two extra boxes to allow you to differentiate between links and their purpose. This is particularly helpful for A/B testing.
Step 3: Click on “Copy URL” and paste it into your email newsletter (ad, social, etc…) instead of your regular “untagged” link.
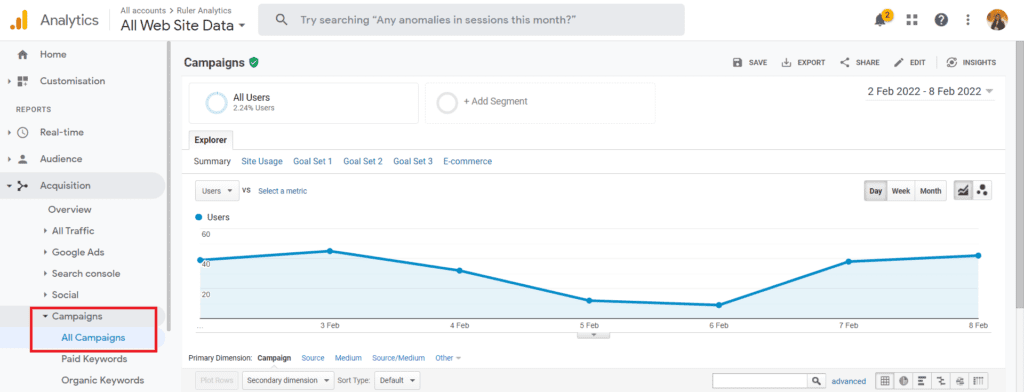
If you’re looking how to track UTM links in GA4, then this is pretty easy too.
You simply need to head to Acquisition > Campaigns.
✏️ Note
Ruler Analytics allows you to track UTM link performance too. You can break it down by each field; source, campaign and content. This allows you to group campaign content easier to see how larger content pushes are working, and to get more visibility on how channels and content types are working to drive more leads and revenue.
Learn more about what data you can see in Ruler, here.
Here, you’re going to see how many visits you received from your campaign, how long they stayed on your website, how many pages on average they visited while they were there, the bounce rate and conversions.
If your website is eCommerce, then you’ll see sales automatically attributed against these links too.
This is a great way of proving how bottom of the funnel content, like emails, are working to drive users over the line.
🚀 Pro Tip
Don’t have an eCommerce site? Don’t worry. Ruler can join the dots between your offline sales and your online leads. Find out how Ruler Analytics attributes closed sales back to your marketing here.
Link clicks are a great starting point.
But they only scratch the surface when it comes to understanding how your marketing is driving results for your bottom line.
In fact, for a lot of marketers, a lot of guesswork is involved to prove their ROI.
And that’s not how it should be.
Do you struggle with tracking because of:
Well, we can help.
Ruler is a marketing attribution tool.
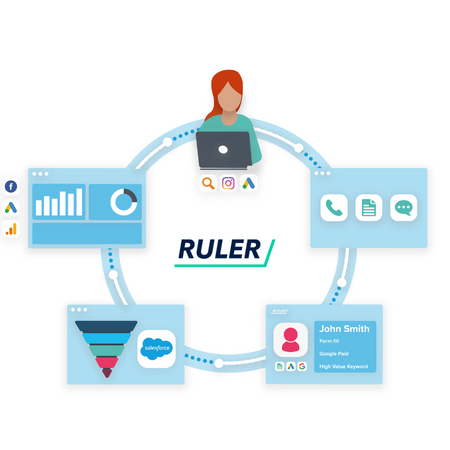
By integrating your website (using a tool like Ruler), and your preferred marketing apps like GA or ad platforms with Google or Bing, you can start to properly attribute your sales back to the campaigns that influenced them.
Someone visits your website. They clicked on a campaign URL you created. Ruler can scrape and hold onto that data, and pool all of the session data for that person.
When they convert into a lead, whether that’s by phone, live chat or form submission, Ruler will fire the session data over to your CRM (or wherever you’re holding your customer data).
Ruler will continue to track, while you work hard to convert them into a sale.
When that hard work pays off, and you place a revenue against that user, Ruler will scrape it and automatically fire it back into applications like Google Analytics.
What does that mean?
Well, as well as call tracking, proper monitoring of your form submissions and live chat, you’ll get real data into how your campaigns are impacting your sales.
So say goodbye to guesswork when it comes to reporting!
Find out more about offline conversion tracking by downloading our FREE eBook, or book a demo with us to find out more about how Ruler can help you get true visibility of your leads.